DIY Wedding Flowers
As you know from the last newsletter, our daughter was married at our home in September. My daughter-in-law, Hattie, and I made all of the flower arrangements for the ceremony. We are both amateurs florists so if we can do it so can you!
I hope by sharing what we did, you will feel confident planning and making your own wedding flower arrangements!

Growing and arranging your own wedding flowers can save money and make your wedding unique and very personal. If you don’t have space to grow flowers, visit local growers to understand the variety of flowers they cultivate. Farmer markets are a good place to make local connections.

You can also ask friends, family, and neighbors if you can harvest their flowers! Most gardeners are happy to share their bounty!
Another budget friendly option is to buy potted plants that are blooming. Simply cut the blooms from the plants and use those in your arrangements.

Climate and growing season will play a big part in what is available at the time of your wedding. Be flexible and aware of these constraints and open to Mother Nature’s plan.
Make a Flower Plan
Planning ahead will reduce the stress of the day! Make a map for each area of the wedding that will require flowers. Try to make your map/list as detailed as possible.
Here is an example:
Wedding ceremony: Arch, two large bouquets, two large wet floral blocks
Wedding runway: 6 bouquets to hang on chairs
Welcome space: 3 vases at champagne table, 1 vase at guest book table,
Brides Bouquet: Cascading hand tied bouquet
Cake Stand: flowers for cake, bouquet for table, 2 small vases for each side of the cake, small wet floral block
Dining Area: 45 small vases
For each of the identified areas, make sub categories lists for the variety and number of flowers you need. Also count the number of vessels/vases required for each space.
Collect vases and supplies well ahead of the wedding so you don’t risk “out of stock” items. The covid shutdown supply chain is still an issue for some items.
Designate a box or basket to store your tools, florist tape, wire, ribbon, and any other miscellaneous supplies as they are purchased or delivered.
Shopping in advance will allow time to thrift or borrow vases or other items that you need.
Harvest Your Flowers

Cut flowers early in the morning and place them immediately in freshwater. This can be done 2 days before the wedding.
If the stems are woody like this eucalyptus, cut the stem at an angle and also up the center so they can drink lots of water.
Keep Flowers Fresh


Keep cut flowers well watered and out of the sun. We used the stairway in my air-conditioned studio as a “cooler”.
Dollar stores and hardware stores are good places to find large buckets to hold cut flowers.
Mood Board

Having a mood board is a good way to keep your desired flower “theme” in mind as you are collecting and building your flower arrangements. It’s easy to get distracted by all those lovely blooms!
Organize your flower buckets for easy “grab and go”. Your hands will be busy holding flowers bouquets in progress so make it easy to find and pull what you need.
DIY Wedding Arch
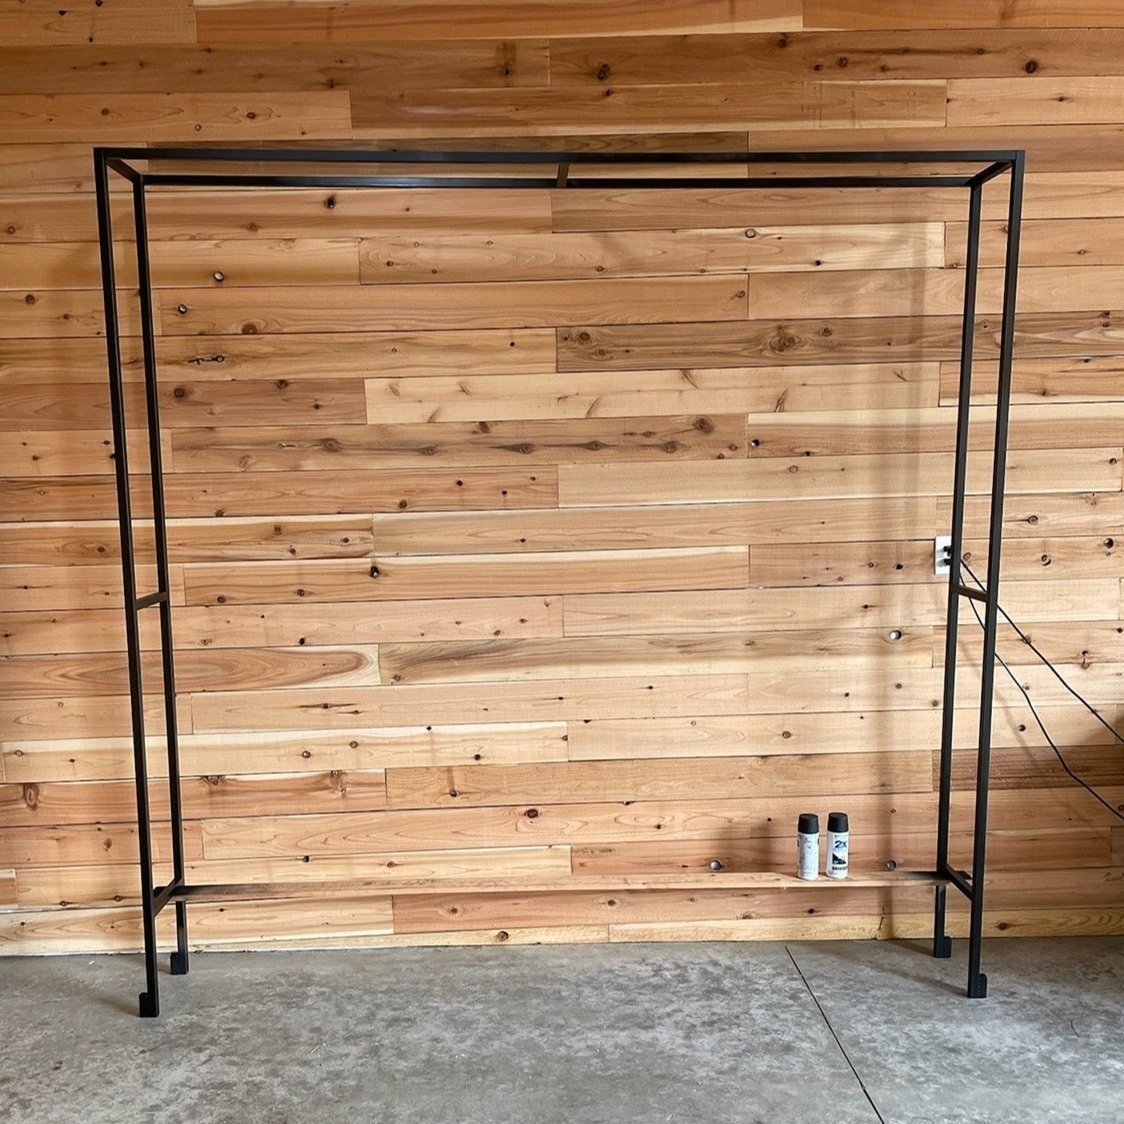
You can build, buy, or rent an arch. My husband built this arch using one inch square metal tubing and then painted it black.
He added stake pockets at the bottom of each leg and we secured it in the ground with four forged spikes.

Visualize where the flowers will be placed on the arch and the general size of your bouquets.

Use a floral foam block cage for each of your arch bouquets. Soak the blocks overnight in a bucket of water. Attach the blocks to the arch with black zip ties.
I made the arch arrangements the day before the wedding and the flowers held beautifully!

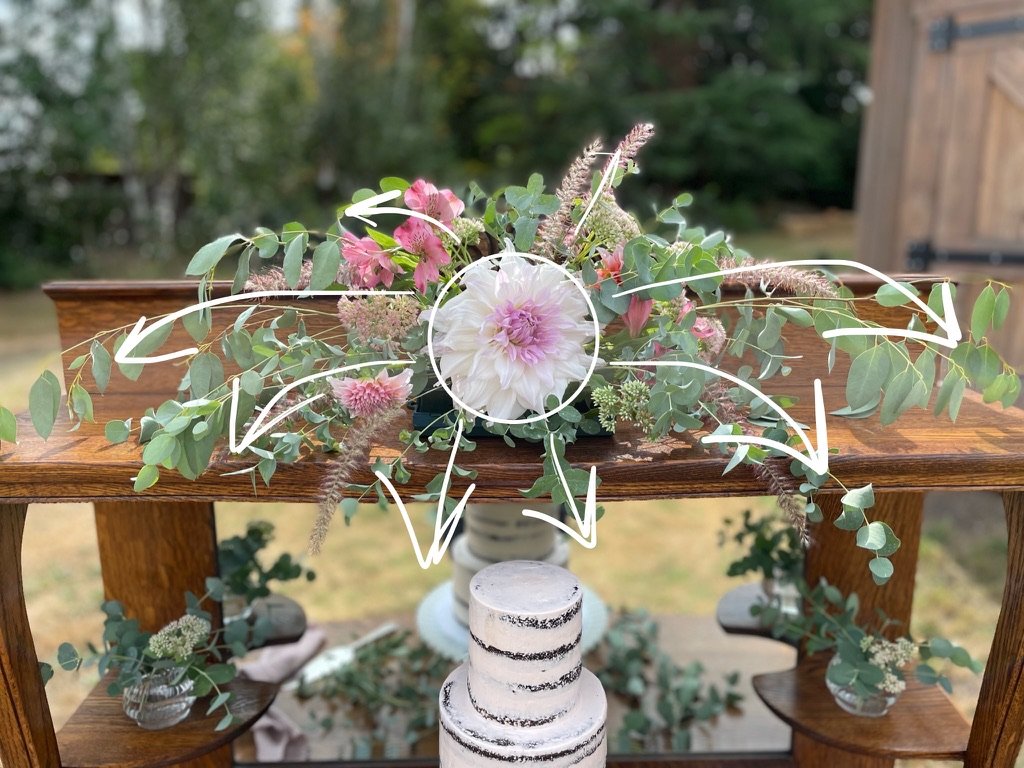
Start the arch bouquets by creating the base shape. You can do this with filler greens such as eucalyptus, dusty miller, ferns, and sedum blooms. Long stems that drape (like eucalyptus and ornamental grass) will help create an airy vibe.

Filler greens should radiate from the center of the block and vary in length. Place shorter branches in the center of the block to create the plane in which you will place the star flowers.


Repeat this process for the side bouquet. When you have the “loose” shape of the bouquets you can start adding blooms.


We used large dahlias and hydrangeas to create a focal point at the center of each bouquet.


Continue to fill in with blooms that follow the shape of your bouquet. We used long grasses, and pink persicaria to add movement and small dark dahlias for a gentle pop of color.
Keep your bouquet open and airy…sometimes less is more!


Add water to the florals blocks as needed before the wedding and keep the arch in a cool shady area.
Carefully move the arch into place and secure it to the ground with stakes.
If the back of the arch is visible, cover the back of the floral blocks with sheet moss. Use hot glue to hold the moss in place.

I found this video very helpful when I was learning how to make wedding arch arrangements.
Chair Bouquets

Small bouquets add a touch of softness to the run way of chairs. They can be zip-tied to the chair without damage and the zip-ties can be hidden with a piece of ribbon.

Hattie made all of the hand tied chair bouquets using a mix of eucalyptus, ferns, sedum, grasses, dahlias, and small dark mums. Do you see a theme here?
We repeated the flower combinations in the chair bouquets to create a cohesive look with the arch for the ceremony area.

Chair boutiques require a flat side to lay nicely against the frame.
Start at the back of the arrangement (flat side) and work to the front. Layer a variety of greens to form a diamond shape. Select different leaf structures, textures, and colors to create interest. After the greens are in place add the “star” flowers to the front of the arrangement.
Use a rubber band to hold the stems together. Place them in a bucket of water until they are needed.

Attach the bouquets to the chairs with a zip tie.

Hide the zip tie by wrapping a ribbon around the chair. Then tie the ribbon in a bow at the base of the flowers.
The Bridal Bouquet
Bridal bouquets are very personal and I really wanted to get it right. Julia and I had many discussions about the “feeling” she wanted and we shared images of many different bouquets and talked about what she liked in each one.

The general feel of the bouquet was to be cascading, just picked from the garden look, with a mix of different flowers.

If you are creating a cascading bouquet, I highly recommend using a mirror to see your work. It is difficult to see the front of the arrangement while you are working on it. There are two focal points in this style of arrangement. One for the bride (looking top down) and one for the guess who will see it straight on. The mirror will help you position flowers in the front of the bouquet.
To make this bouquet, I started at the bottom and worked to the top.
Hold the stems like you are the bride. Create the cascade with long drapey flowers and greens. Then start filling in with shorter pieces working your way to the top center.
Be sure to add a “star” flower at the top of the bouquet for the bride to see!
Cut the stems even but long enough to fit in a water vase.

I’m pretty sure she liked it! Big happy tears for me!

Leave the bouquet in water as long as you can! On the day of the wedding, trim the stems to form a nice handle and wrap them with ribbon.


Champagne Greeting

Make as many bouquets as you can with your remaining flowers. You never know where you may want to place an extra pop of color.

Clear vases are the most versatile and can be purchased at thrift stores for a few dollars. If your wedding is outside, ceramic pitchers and colored vases that compliment your theme are also fun!
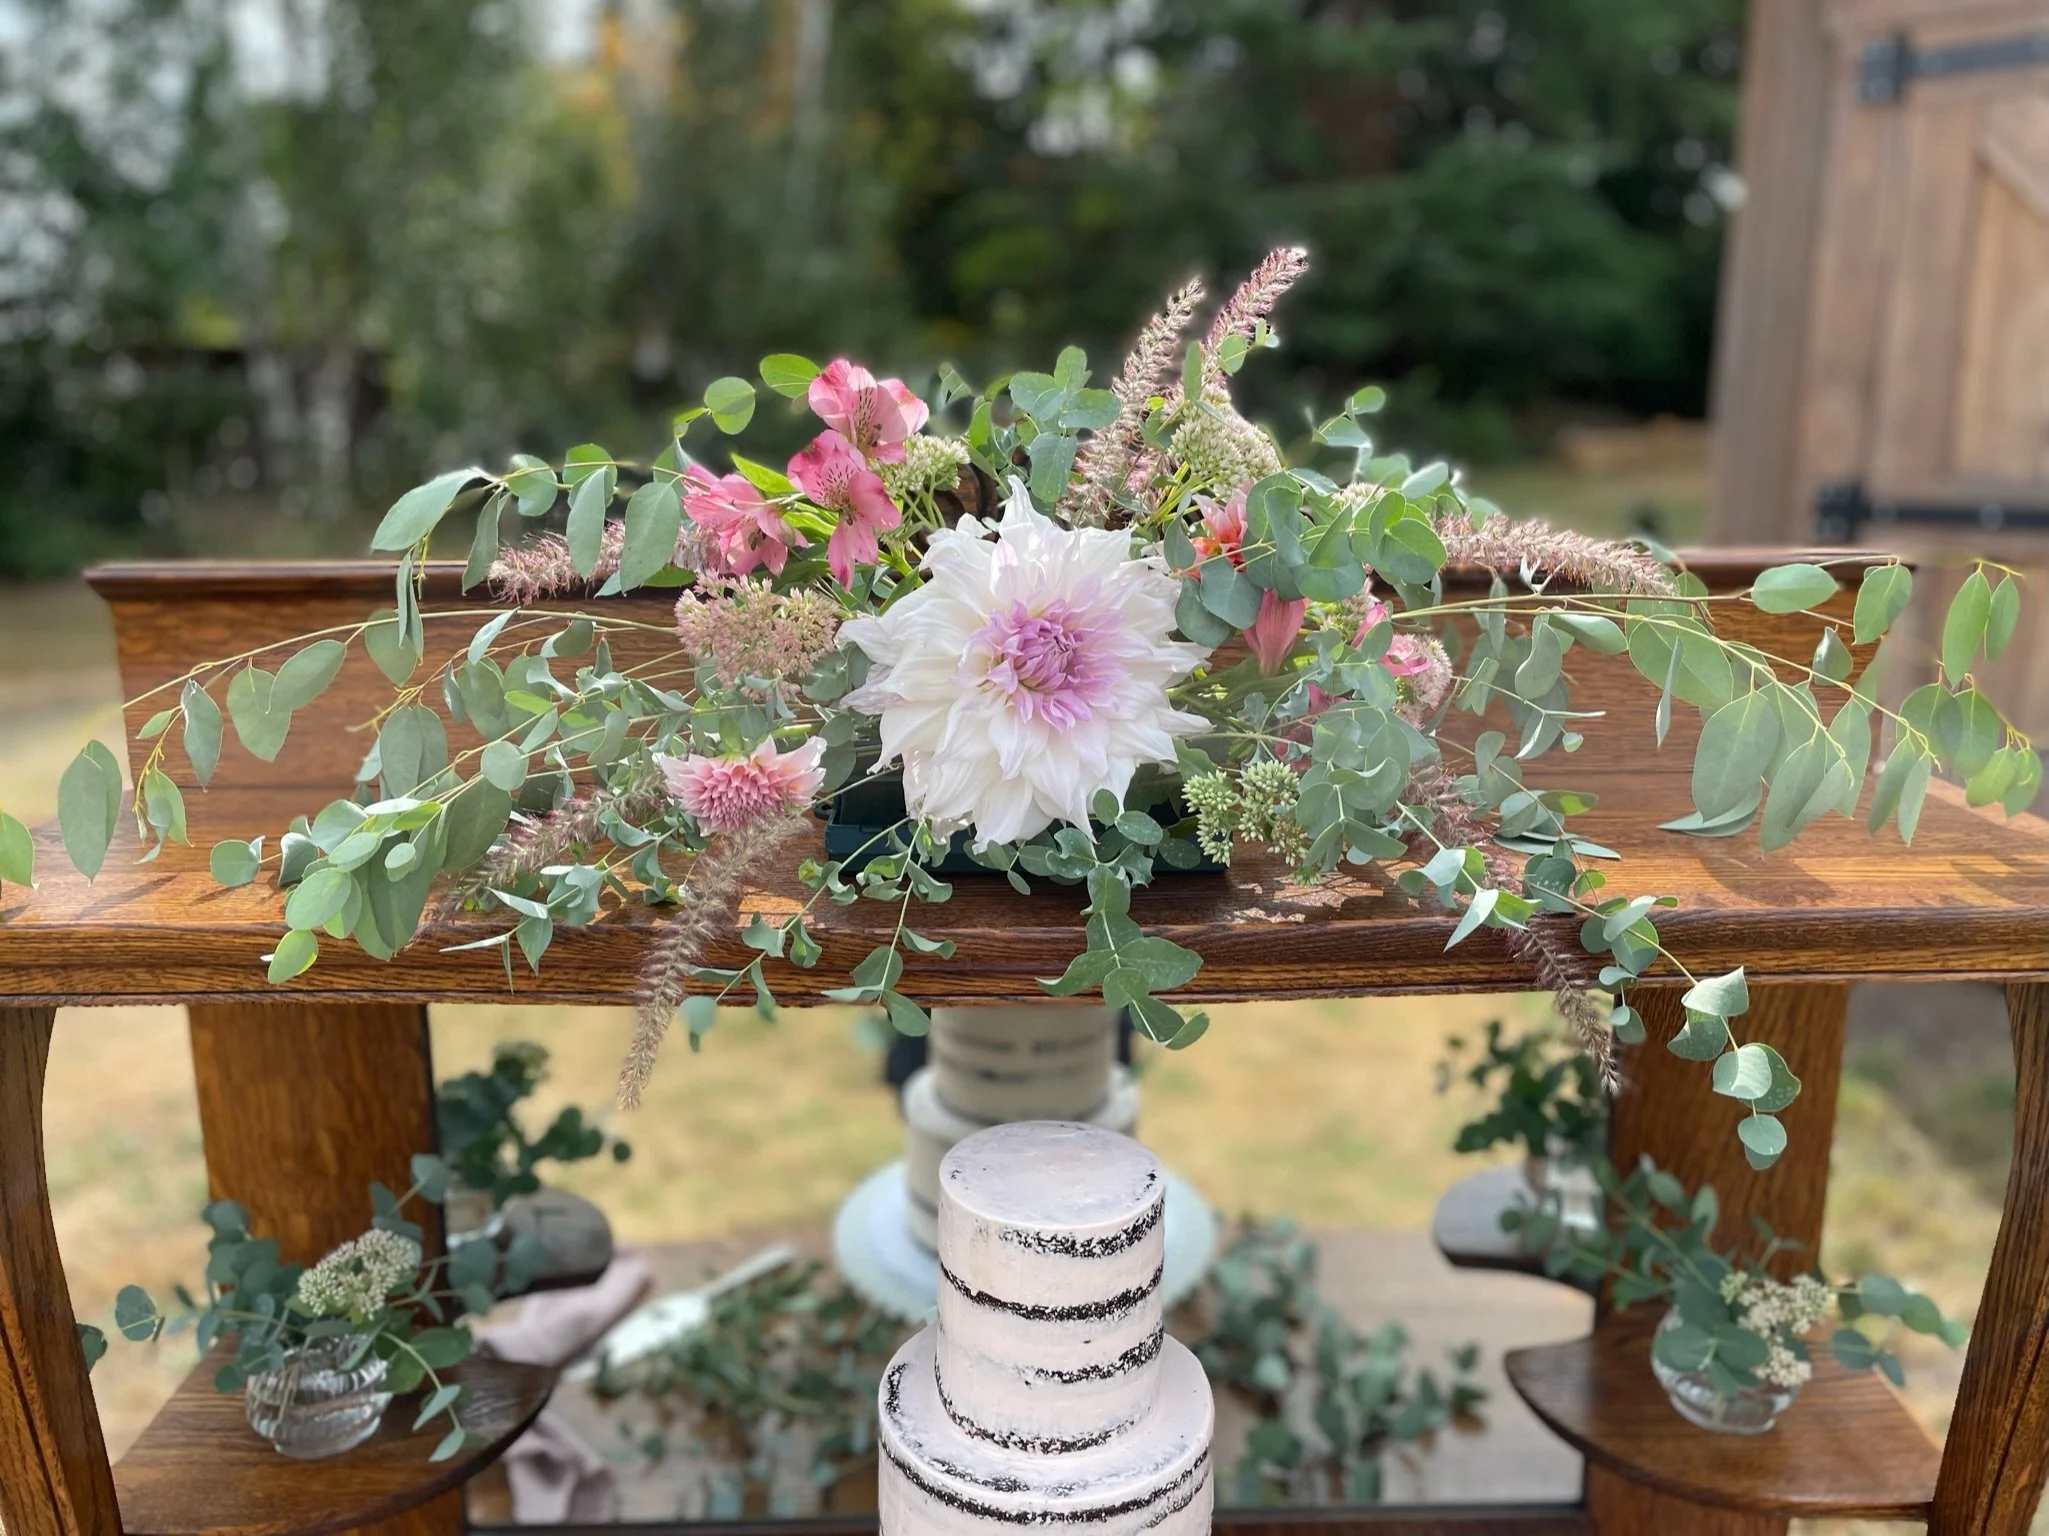
Cake Stand

Placing a few flowers or greens around the cake adds an elegant touch. We kept it simple with a few stems of eucalyptus around the base of the cake and two small vases on the buffet shelves.

We also added a larger arrangement above the cake.
I used a wet floral block for this arrangement. It was soaked overnight in water and placed on a tray.
The arrangement was made in the same way as the arch bouquets. I formed the shape with long drapey greens and grasses and then filled in with shorter blooms moving toward the center. A large dahlia was added at the center.
In our next wedding blog we will talk about table decorations!


Barebones Flatware
$17.50
If you love setting a beautiful table or packing a picnic you are going to love this minimalist vintage style flatware! Dress them with china or toss them in your bicycle basket with your baguette. Either way…you will enjoy the way they feel and perform!
Matte finish make them perfect for food photography!
Sold in single sets: one each fork, knife, spoon.
Stainless steel, dishwasher safe, Matte finish
Dimensions: 9.2” x 1.4” x 1.0”